“Spirit PI” Wireless Metal Detector

Donation:

The purpose of this project is to make a cheap but effective pulse inductions metal detector. If you want to support the project you can make your donation here! Thank you!

Description:

“Spirit PI” is a pulse inductions metal detector. This metal detector is based on an Arduino or ESP32 microcontroller and a smartphone. It is easier to make than a VLF metal detector because you do not need to adjust the coils and adjust the balance of the coils. In this metal detector we only use one coil that at the same time is the transmitter coil Tx and the receiver coil Rx. The same coil sends the signal and then receives it. This type of metal detector (pulse induction) works at very low frequency only about 60 Hz which allows us to process the signal easier, for example with the help of an Arduino microcontroller.
To make it wireless I decided to use a bluetooth module hc-05 and in this way send the data received from the coil to the smartphone. To process the data in the smartphone we will use my new app “Spirit PI” Wirless Metal Detector.

At the moment the project is in development mode. Everything already works but I still have to make final tests of the application before uploading it to PlayStore. This page will soon be updated and I will add all the information so that you can build this wireless metal detector.
You can subscribe to my blog and my YouTube channel to receive the notification when I publish the entire project.

The components we need:

Cheap components from Aliexpress:

Step 1: The coil

The coil is quite simple and only has 25 turns. To increase the sensitivity you can try to increase or decrease a few turns. In this video tutorial you can see how it is done. There are several ways to make the coil but I like the way I do in the video. The diameter of the coil is 20 cm and the thickness of the enameled wire is 0.7 mmWe can use from 0.5mm to 0.7mm the thickness of the wire. 

3D printed coil:

Here you can find 3D models of the coil mold to download and print on the 3D printer. The diameter of the coil must be 200mm so that it enters the mold. 

The mold for the coil is made of 5 parts. The parts are connected to each other with connectors and then we can glue them with a glue.
The connector part that connects the three parts of the coil between the file only one but we need 3 connectors. Simply multiply the piece 3 times and that’s it.

3D printers from Aliexpress:

Step 2: Increase the transmission speed of module hc-05

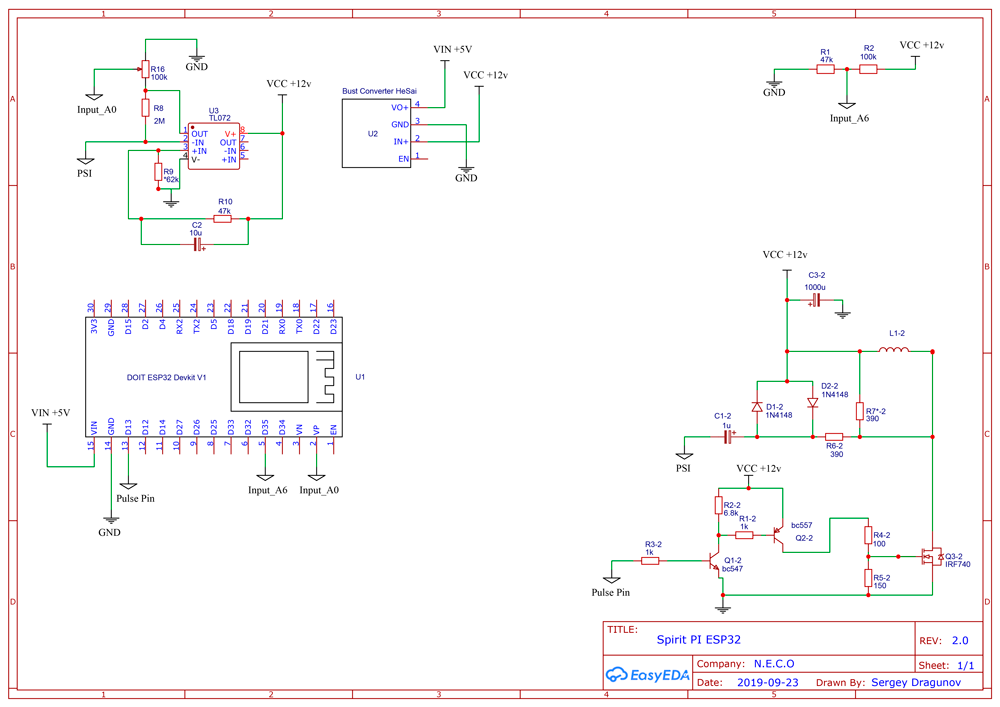
New version is available, if you will make the circuit with microcontroller ESP32 just skip this step, because microcontroller ESP32  have bluetooth modul and it no need adjust  it.

The first thing we must do is prepare everything before assemble on a PCB board. All the components are ready to be used, we just have to upload sketch to arduino and increase the transmission speed of bluetooth module hc-05.
Before uploading the main sketch to the arduino we must upload a small sketch that will help us to choose the baud rate of bluetooth module hc-05 and change the name of the bluetooth module.
This method is only for bluetooth module hc-05. If you have another bluetooth module for example hc-06, you can search the internet, there is a lot of information on this topic.
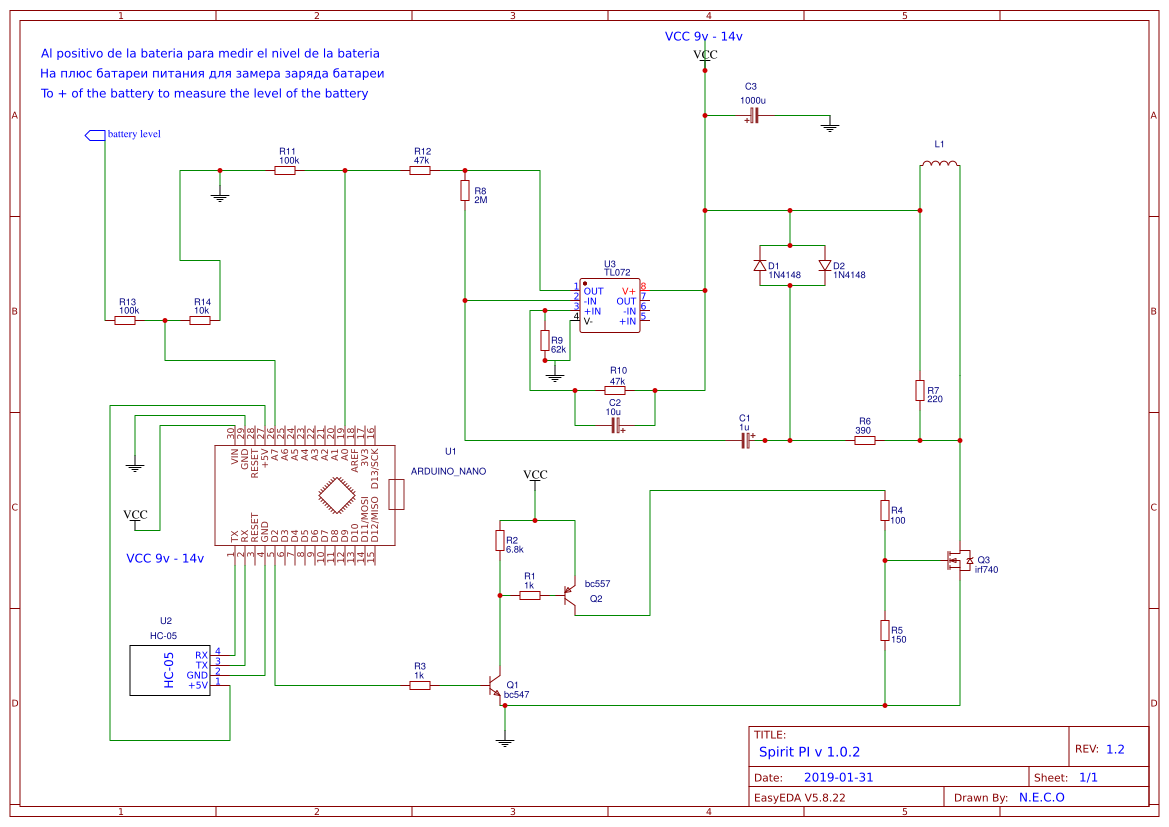
First, take the arduino and connect it to the PC. We upload the sketch that you will find here, the sketch is called “Sketch_commands_at”. When the sketch is already up we connect the bluetooth module. Pin “Tx” of the bluetooth module is connected to the digital pin 10 of the arduino, and the “Rx” pin of the bluetooth module is connected to the digital pin 11 of the arduino.
To be able to enter the AT command mode of the bluetooth module we must do the following:
We press the button that has the Bluetooth module HC-05 at the same time that we turn on the power. The LED will start blinking slowly which means that it is in the AT mode, and we can send the AT commands to the bluetooth module. Now we open the Arduino IDE program and open Monitor series you can find it in Tools. On the Monitor series, make sure that “Both NL & CR” and “38400 baud” are selected below.
Now we write: “AT” on Monitor series and press enter. If we have done everything correct, the message “OK” should appear, if it does not appear, look at previous steps.
If you have received the answer “OK” now we can change the transmission speed. We write the following:
AT+UART=115200,0,0 and press enter, if everything goes well, the message “OK” should appear, which means that the baud rate has been successfully changed. The next step is to change the name so that a friendly name appears on our smartphone. We write AT+NAME=Spirit PI and press the enter. Again the message “OK” should appear. Ready! We have already changed the transmission speed and the name of the bluetooth module.
In the next step we will have to make the circuit and upload the main sketch to arduino. At the moment we can disconnect the bluetooth module and the arduino, we will need them in the next step.

Step 3: Assemble the circuit

To start we will prepare all the components that we will need (the list of necessary components is at the beginning of the page). In the previous step we have adjusted the bluetooth module, and now before we start to assemble the circuit we need  upload the main sketch to the arduino. If you have not yet adjusted the bluetooth module, go back to the previous step. The main sketch can be found here below this description. After uploading the main sketch we soldered all the components following the schematic. If everything is well done and there are no errors the detector should work without problems. Before trying it we must connect the app to bluetooth module. How to pair the bluetooth module with your smartphone you can see for example in the section of “Arduino Multimetro” there i explain with images how it is done. After pair the bluetooth module we go to the settings of the “Spirirt PI” app (bluetooth must be activated) and we open the settings. Within the settings we select “Set bluetooth module“. In the window that appears we chose the name of our bluetooth module. It should be “Spirit PI” if you did step 2 and put this name on it. Ready!! From now when you open the app just press the “Connect” button and the app will connect to the coil. Below you can find the schematic and the main sketch


Schematic for Arduino version:

Schematic for ESP32 version 2.0.0

The best results can be achieved if we replace the Arduino microcontroller with an ESP32 microcontroller. The ESP32 microcontroller is more powerful and also has a built-in bluetooth module, so the circuit will be more compact. The cost of esp32 is not much higher than Arduino but if we take into account that we will not need to buy a bluetooth module then we still get cheaper ESP32 than Arduino. The sketch for ESP32 is a bit different and we can not load to ESP32 the arduino sketch, so if you still do not see the button to download the sketch for ESP32 that means it soon will be available. The schematic you will find below, it is perfectly clear that it is not very different from the arduino schematic, so it is not very difficult to modify it.