UBRControl user guide
Drive your Arduino robot over Bluetooth, or turn your phone into a gamepad for PC games over Wi-Fi.
What do you want to control?
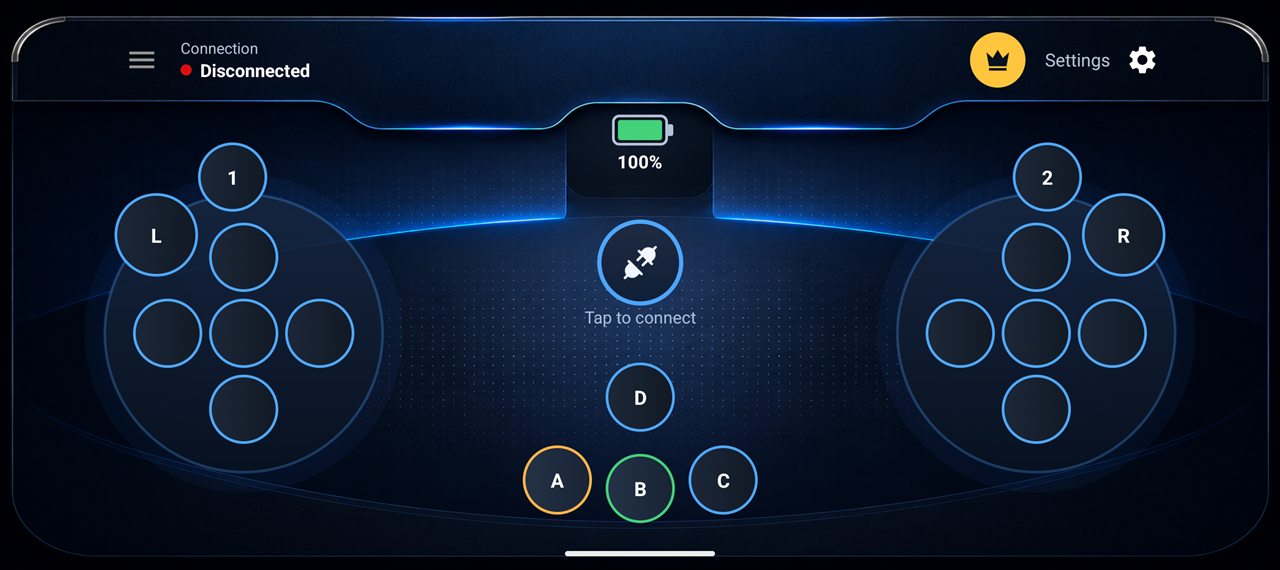
Control an Arduino robot over Bluetooth
The app sends a short text command for every button you press. Your Arduino reads it from a Bluetooth module and moves the motors, lights a LED or does anything else you program.
What you need
- An Android phoneWith Bluetooth and UBRControl installed.
- An Arduino boardUno, Nano, Mega or similar.
- An HC-05 or HC-06 moduleClassic Bluetooth. BLE modules such as HM-10 are not supported yet.
- The UBRControl sketchDownload the Arduino sketch and wiring
Connect and drive
-
1
Pair the module with your phone
Power the robot. On the phone open Settings › Bluetooth and pair the module. It usually appears as HC-05 or HC-06, and the PIN is 1234 or 0000.
-
2
Choose the module in the app
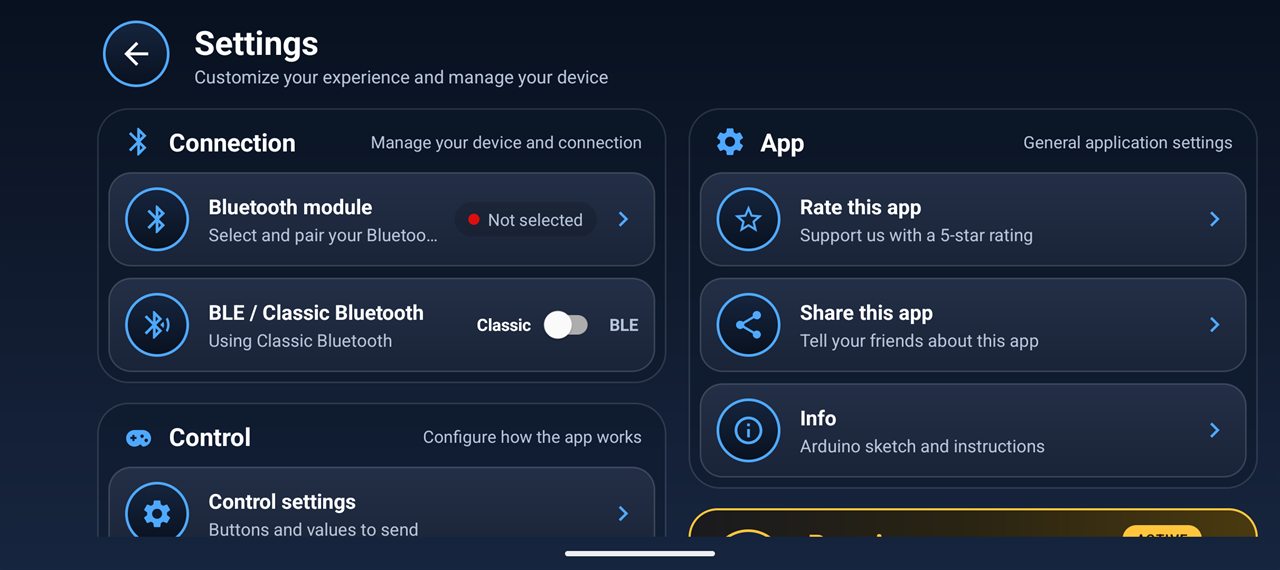
Open UBRControl and tap Settings (gear, top right), then Bluetooth module. Pick your module under Paired devices.
Not in the list? Tap Found devices to search for it.
-
3
Connect
Go back to the control screen and tap the plug button in the middle. When the status at the top left shows Device connected, you are ready.
- Direction pads send their command every 100 ms while you hold them.
- Buttons A, B, C, D, 1, 2, L and R send their command once per tap.
-
4
Change what each control sends
Open Settings › Control settings and tap any row to type a new command. It can be a single letter or longer text such as speed:200.
Reset to default puts every control back to its original letter.
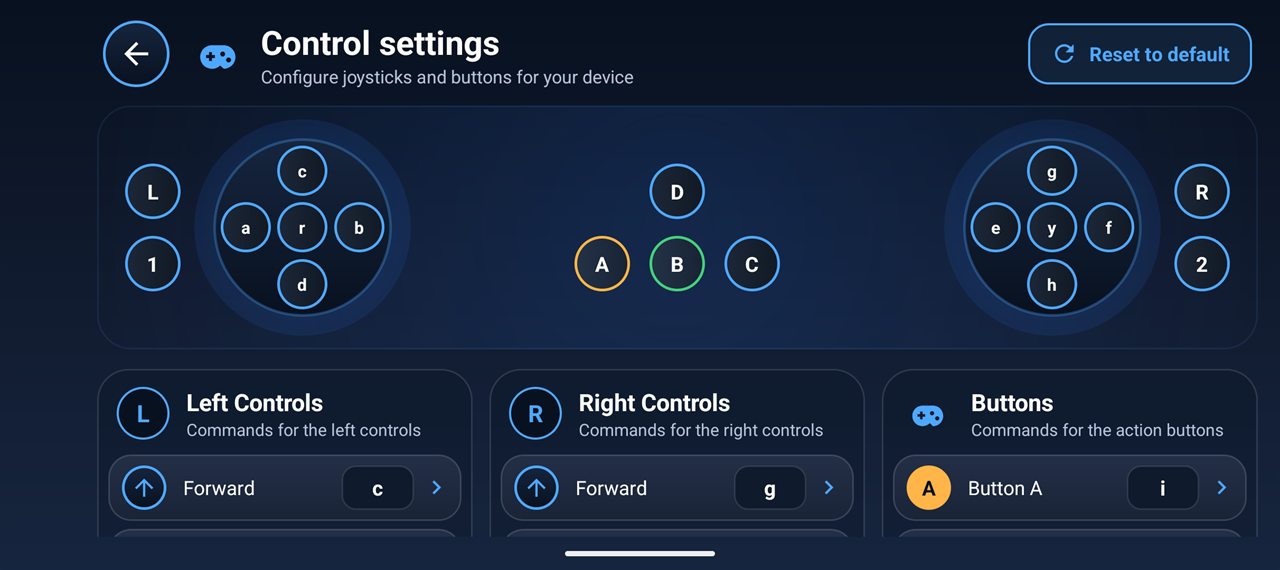
Default commands
Program your Arduino to react to these letters, or change them in Control settings.
Left pad
| Forward | c |
| Back | d |
| Left | a |
| Right | b |
| Center | r |
Right pad
| Forward | g |
| Back | h |
| Left | e |
| Right | f |
| Center | y |
Buttons
| A, B, C, D | i j k l |
| 1, 2 | m n |
| L, R | o p |
// Minimal example for the default screen.
// HC-05/HC-06: module TX to pin 10, module RX to pin 11 (through a voltage divider).
#include <SoftwareSerial.h>

SoftwareSerial bt(10, 11);   // RX, TX
unsigned long lastCommand = 0;

void setup() {
  bt.begin(9600);            // HC-05 / HC-06 default speed
}

void loop() {
  if (bt.available()) {
    char command = bt.read();
    lastCommand = millis();
    switch (command) {
      case 'c': forward();  break;
      case 'd': backward(); break;
      case 'a': turnLeft(); break;
      case 'b': turnRight(); break;
      case 'i': horn();     break;   // button A
    }
  }
  // Pads repeat every 100 ms while held and send nothing on release,
  // so stop the motors when commands stop arriving.
  if (millis() - lastCommand > 250) stopMotors();
}

// Write forward(), backward(), turnLeft(), turnRight(), horn() and
// stopMotors() for your motor driver.
Design your own control screen
Place only the buttons and joysticks your project needs, give them your own labels and commands, and put them where your thumbs want them.
-
1
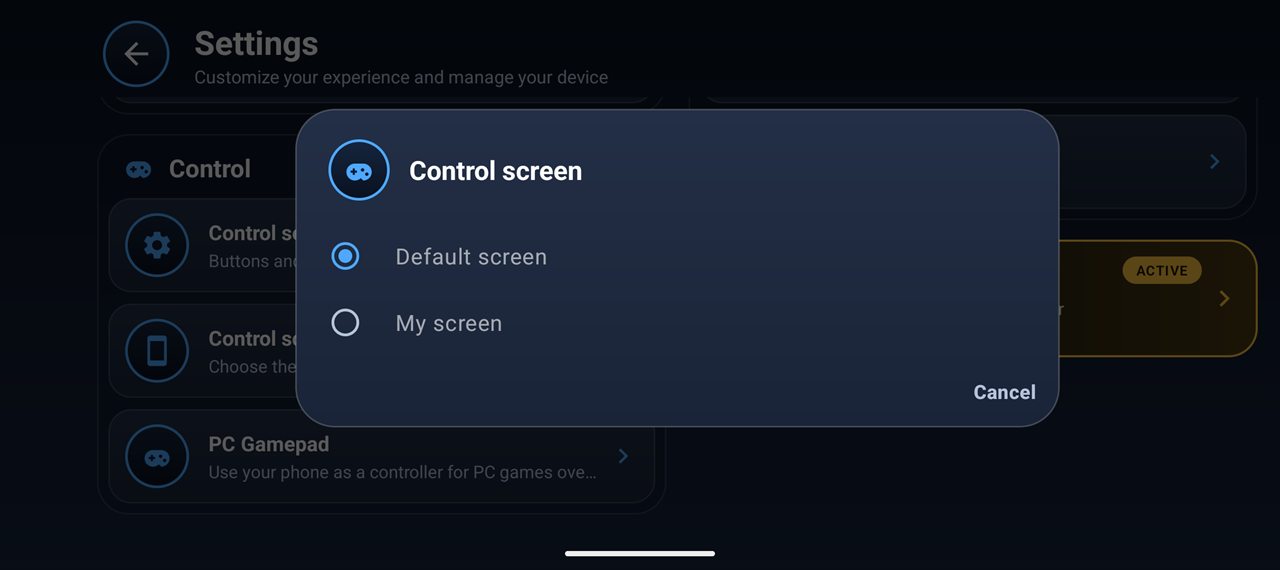
Switch to My screen
Open Settings › Control screen and choose My screen. Go back to see your empty screen.
-
2
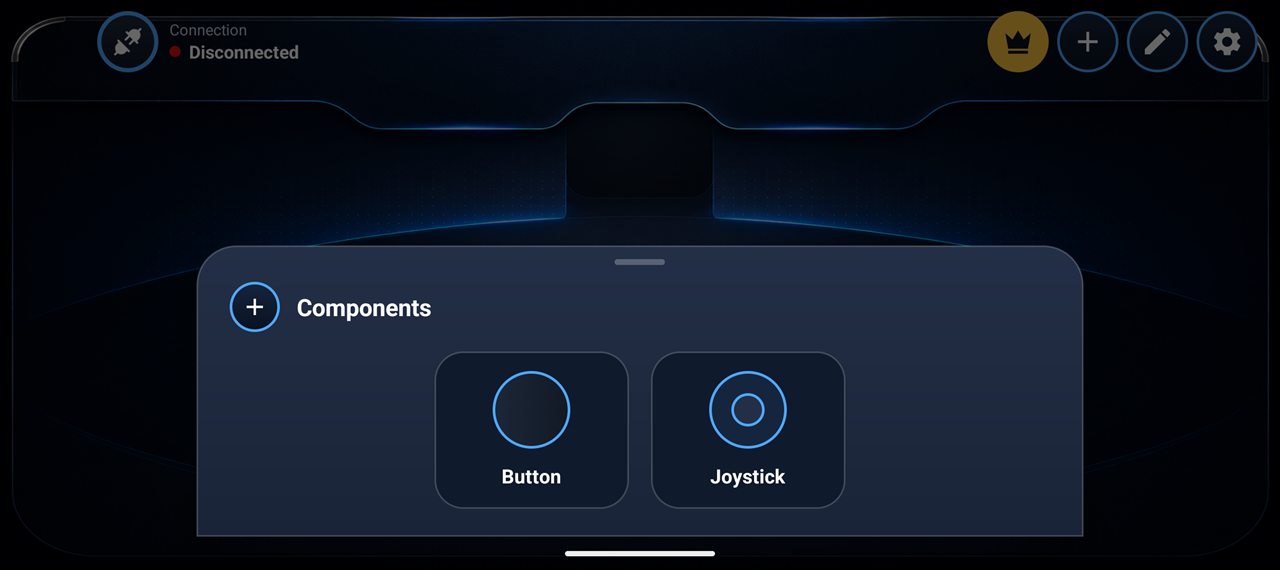
Add buttons and joysticks
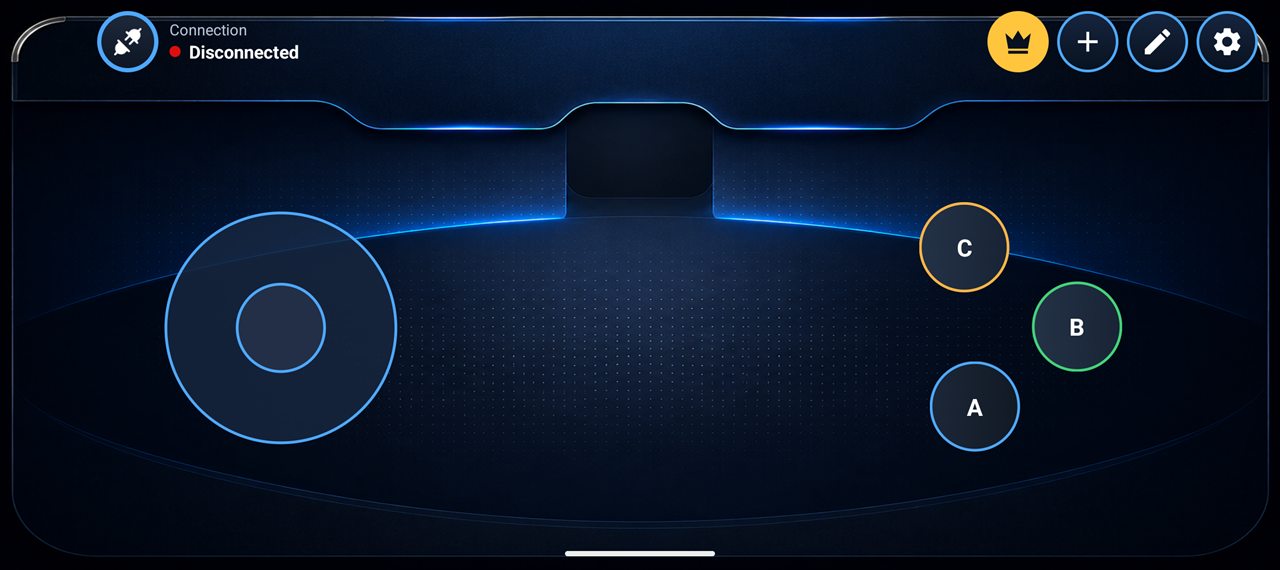
Tap + at the top and choose Button or Joystick. Add as many as you like.
-
3
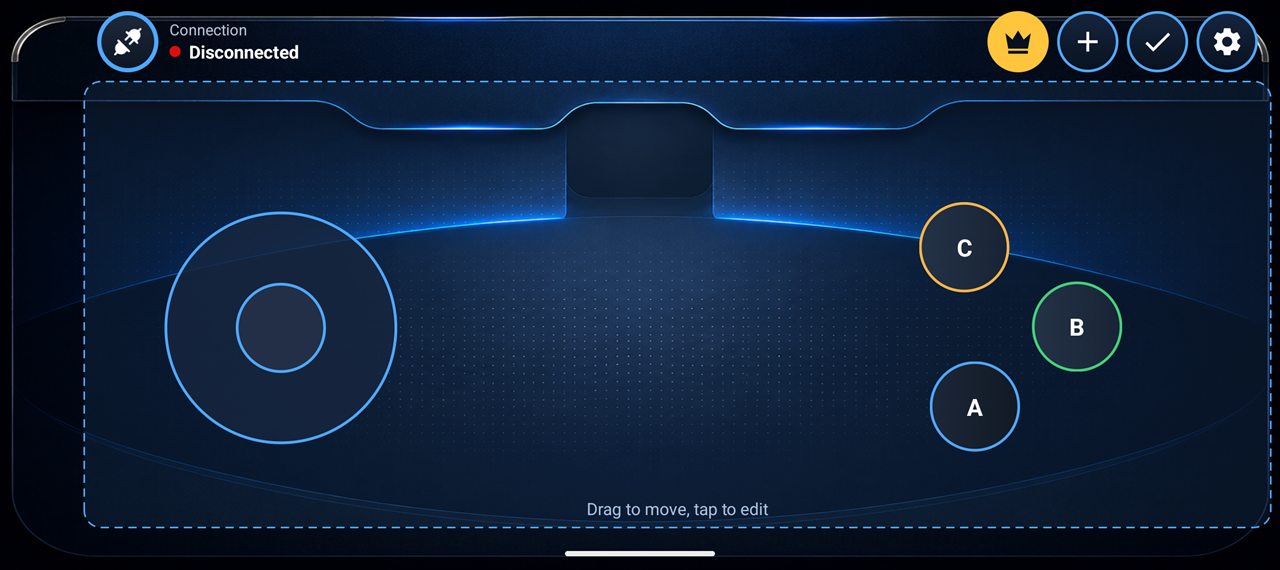
Move them into place
While the screen is in edit mode (dashed frame), drag any control to move it. Tap the pencil to enter edit mode again later.
-
4
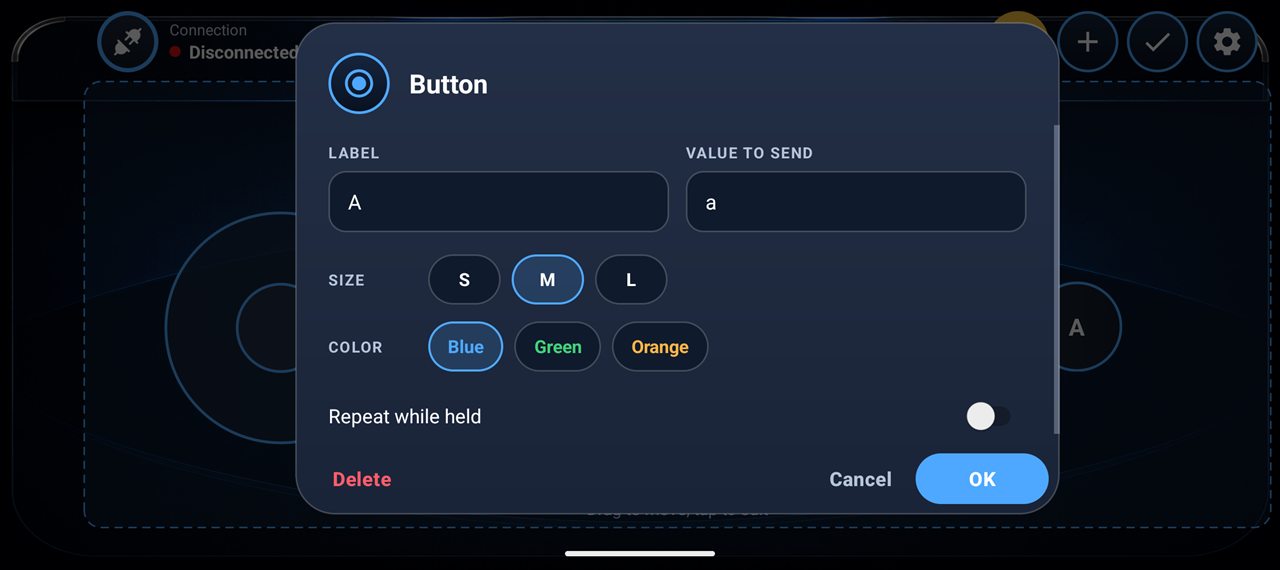
Set what a button sends
Tap a button in edit mode to change its label, the value it sends, its size and color.
Turn on Repeat while held for controls like a motor that should run as long as you hold the button.
-
5
Set up a joystick
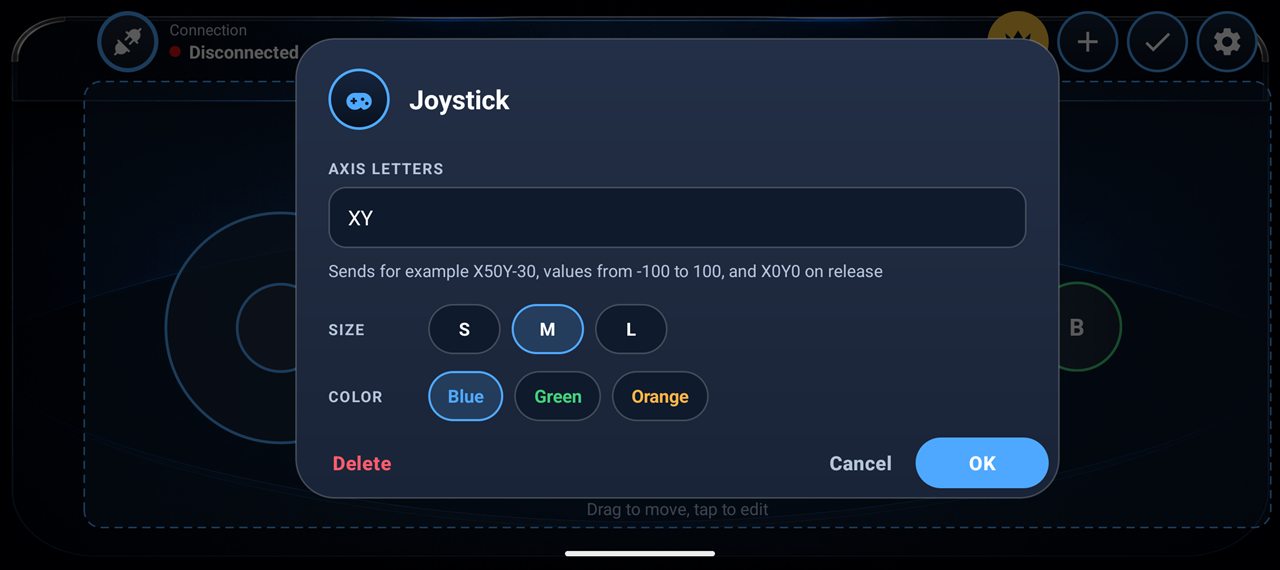
A joystick sends its position as two numbers from -100 to 100, for example X50Y-30, and X0Y0 when you let go. Change the letters if your sketch expects others.
-
6
Save and play
Tap the check mark to leave edit mode. Your layout is saved and opens every time you start the app.
If something doesn't work
My module is not in the list
Pair it first in the phone's Bluetooth settings, then open Bluetooth module in the app again. Check that the module is powered: its LED blinks fast while it waits for a connection.
The app can't connect
A module accepts one phone at a time, so disconnect any other phone. Turn the robot off and on, then tap the connect button again.
If Android asks for the Nearby devices permission, allow it.
Connected, but the robot doesn't move
Check that the sketch uses 9600 baud, that module TX goes to the Arduino RX pin and RX to TX, and that the letters in Control settings match the ones your sketch expects.
The robot keeps moving after I let go
The pads send nothing on release. Stop the motors in your sketch when no command arrives for about 250 ms, as in the example above.
Use your phone as a gamepad for PC games
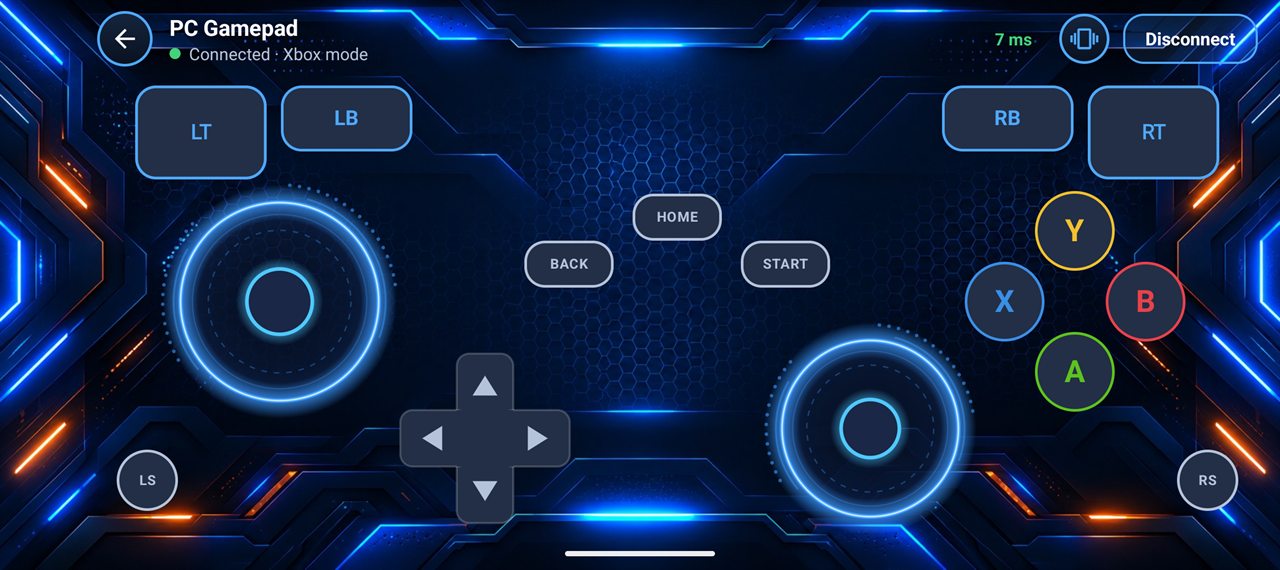
The PC Gamepad screen turns your phone into an Xbox-style controller. A small free Windows program receives it over Wi-Fi and passes it to your games.
What you need
- An Android phoneWith UBRControl installed.
- A Windows 10 or 11 PC64-bit, on the same Wi-Fi network as the phone.
- UBR Gamepad ServerDownload the PC program. Free, no installation.
- ViGEmBus driverOptional. Makes games see a real Xbox controller. Get ViGEmBus
Two ways your PC can see the phone
The PC program picks the mode by itself: Xbox controller when ViGEmBus is installed, keyboard and mouse when it isn't. The app shows which one is active.
| Keyboard and mouse | Xbox controller | |
|---|---|---|
| Install | Only the PC program | PC program and ViGEmBus, once |
| Works with | Games played with keyboard and mouse | Every game with controller support |
| Sticks | Left: W A S D. Right: mouse | Fully analog |
| Triggers | Mouse buttons | Analog, press lightly or fully |
| Vibration | No | Yes, the phone vibrates with the game |
Set up and play
-
1
Start the PC program
Unzip the download and open UbrGamepadServer.exe. A gamepad icon appears next to the clock. From now on it starts with Windows by itself.
- If Windows SmartScreen warns you, choose More info, then Run anyway.
- If Windows Firewall asks, choose Allow for private networks.
- For Xbox controller mode, install ViGEmBus and restart the PC.
-
2
Open PC Gamepad in the app
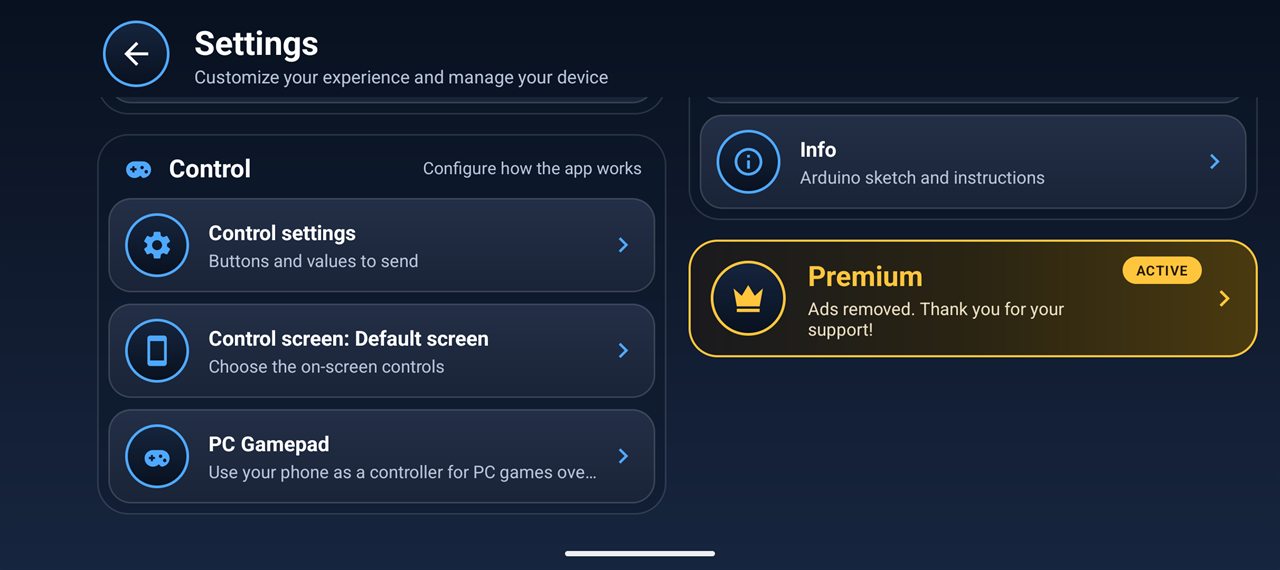
In UBRControl go to Settings › PC Gamepad.
-
3
Connect to your PC
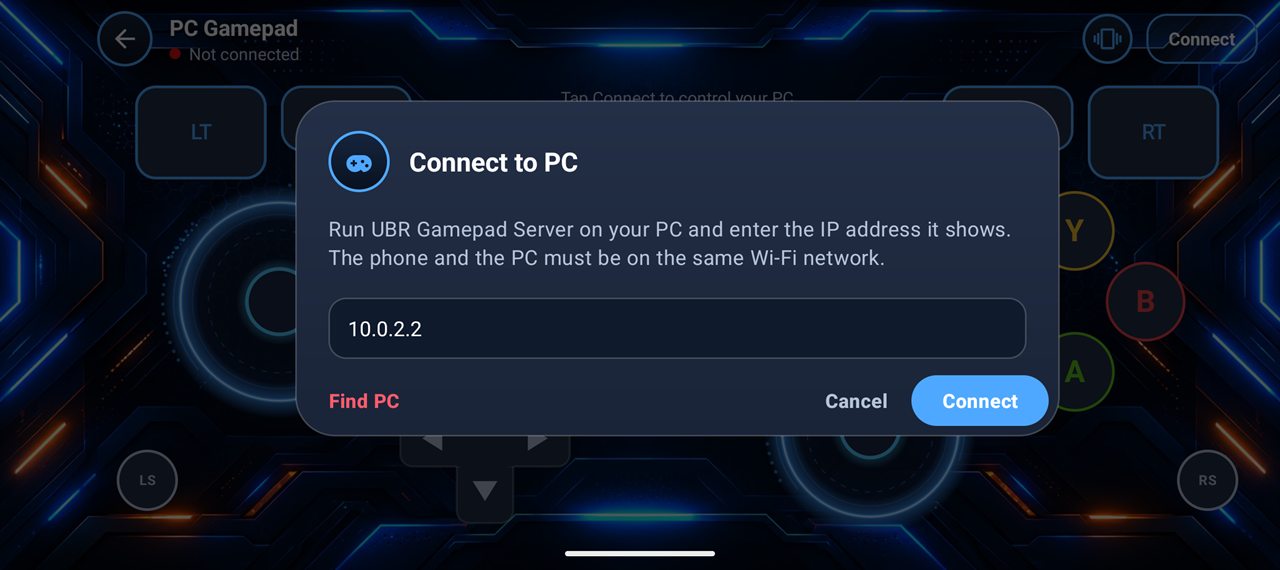
Tap Connect, then Find PC. If your PC isn't found, type its address instead.
To see the address, right-click the gamepad icon next to the clock. Clicking the address copies it.
-
4
Play
The status turns green and shows the mode and the delay in milliseconds. The icon on the PC turns green too. Start any game.
- Press several buttons at once, with as many fingers as you need.
- LT and RT are analog: touch near the top for a light press, the bottom for a full press.
- The vibration button next to Connect turns game vibration on or off.
Analog triggers and game vibration are Premium extras, explained below.
Using the gamepad
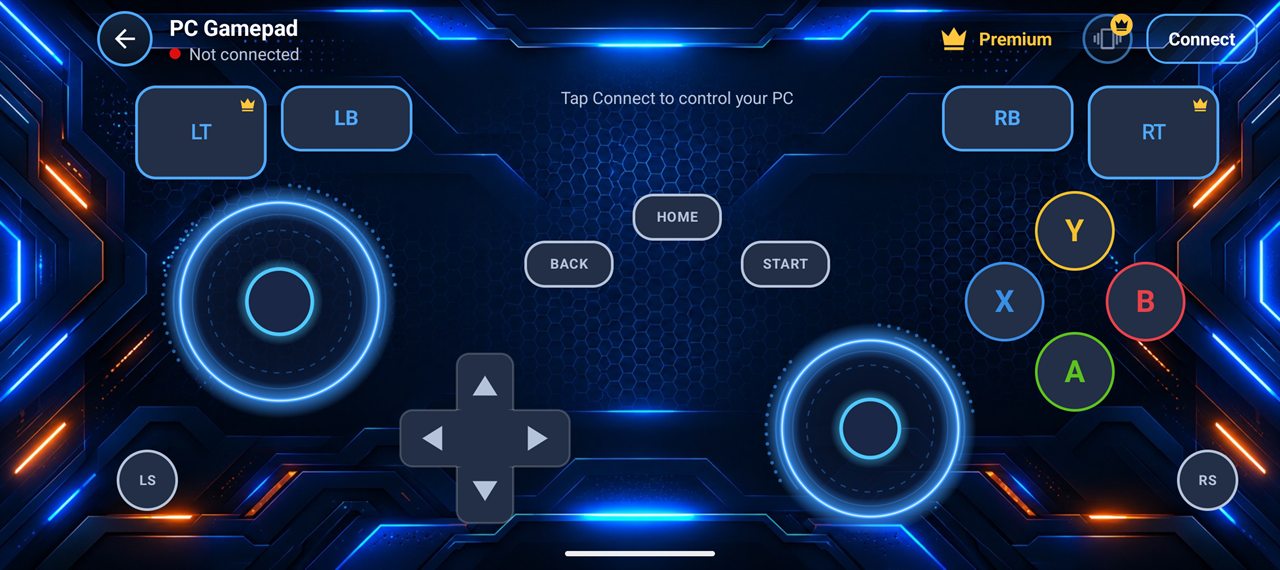
The layout follows an Xbox controller, so games show the same buttons you see on the screen. The numbers match the list below.
- 1Left stickMove. Push a little to walk, all the way to run.
- 2Right stickLook around and aim.
- 3D-padSlide one finger between the arrows. Touch between two arrows for a diagonal.
- 4A, B, X, YAction buttons, in the same colors as on an Xbox controller.
- 5LB, RBBumpers.
- 6LT, RTTriggers. Touch near the top for a light press and near the bottom for a full one.
- 7Back, Home, StartHome is the Xbox button. Back and Start are the View and Menu buttons.
- 8LS, RSStick clicks. On a real controller you press the stick down; here they are separate buttons.
- 9StatusShows whether the PC is connected, and in Xbox or keyboard mode.
- 10Delay, vibration, ConnectDelay in milliseconds (green is under 20 ms), game vibration on or off, and Connect or Disconnect.
- Use as many fingers as you need: hold a stick and press buttons at the same time.
- When you lift your thumb, the stick springs back to the center, like a real one.
- The screen stays on while the gamepad is open.
- If you switch to another app, every button is released, and the phone reconnects when you come back.
Free and Premium
Everything above works in the free version. Two extras are part of Premium, marked with a crown.
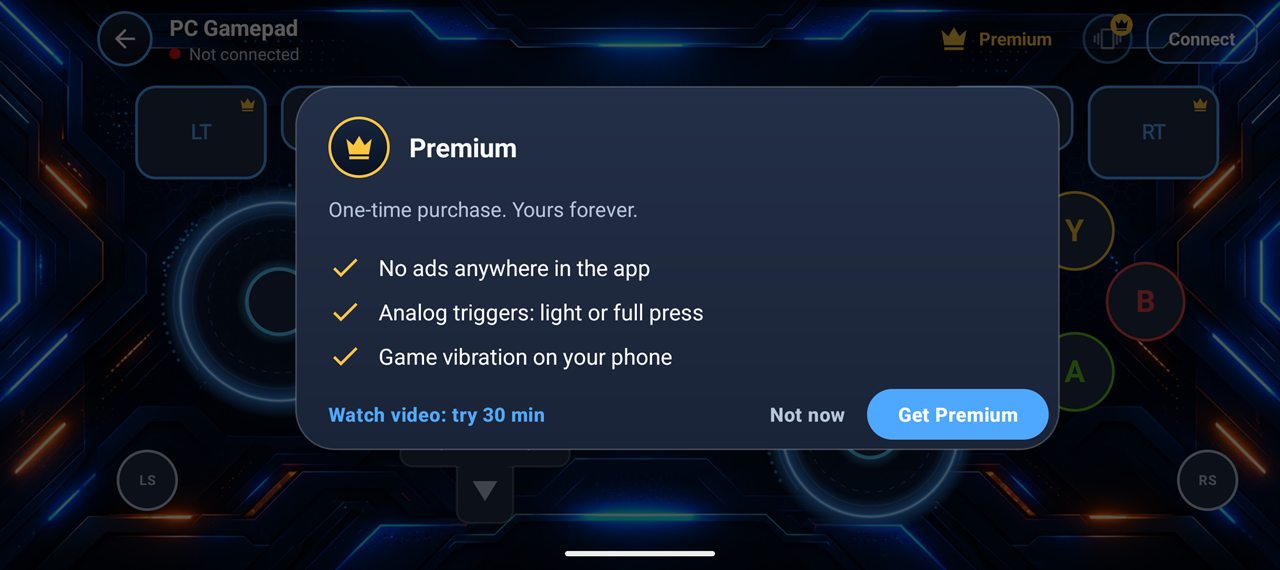
- Analog triggers. In the free version LT and RT always press fully.
- Game vibration. In the free version the phone does not vibrate with the game.
- No ads. In the free version an ad can appear when you open the PC Gamepad, never while you play.
- Try it free: tap the Premium chip and choose Watch video to unlock triggers and vibration for 30 minutes. Get Premium unlocks everything for good with a one-time purchase.
Keys in keyboard and mouse mode
These are the default keys. To change them, right-click the gamepad icon and choose Edit keyboard keys, then restart the program.
Sticks and triggers
| Left stick | W A S D |
| Right stick | Mouse |
| RT | Left click |
| LT | Right click |
| LS, RS click | Shift V |
Buttons
| A, B | Space C |
| X, Y | R E |
| LB, RB | Q F |
| Back, Start | Tab Esc |
| D-pad up, right, down, left | 1 2 3 4 |
If something doesn't work
The app says "PC is not answering"
Check that the gamepad icon is next to the clock and that the phone and PC are on the same Wi-Fi network.
If it still fails, allow the program in Windows Security › Firewall › Allow an app through firewall, with Private ticked.
Find PC finds nothing
Some routers and phone hotspots block the search. Type the PC address instead; right-click the gamepad icon to see it.
It shows Keyboard mode after installing ViGEmBus
Restart the PC once after installing the driver. Then right-click the icon to check that it says Mode: Xbox controller.
A game ignores the phone in keyboard mode
Games started as administrator only accept keys from programs that also run as administrator. Right-click UbrGamepadServer.exe and choose Run as administrator, or use Xbox controller mode.
The controls feel slow
Use 5 GHz Wi-Fi, connect the PC to the router with a cable if you can, and keep the phone close to the router. A delay under 20 ms shows in green.
How do I stop it starting with Windows?
Right-click the gamepad icon and untick Start with Windows. Quit in the same menu closes the program.